

It's one of my best friend's birthdays this week (hello lovely!), so I've decided to create some lovely washi tape feathers to jazz up her gift. These are really simple and really cute so I thought I would create a quick little DIY for you - I bet they're going to be super handy when Chrismas comes around!

All you need is some washi tape, a little bit of string and a pair of scissors...

Take a piece of washi tape that's around 3 inches long (a good size to start with), and lay your string down the middle of it. If you let a little extra string hang over each end of the tape, you can pull it tight and it'll stick down straight.
When you're happy with the positioning of the string, cut out another piece of tape at the same size and stick it over the top to create a little string sandwich. Don't worry if they don't match up exactly, you can trim off any overhanging tape.

Cut around the piece of tape into a feather shape. The great things about feathers is that they come in all shapes and sizes, so don't worry if it's a little wobbly :)

Next up you want to make it more feathery! Using your scissors, snip little diagonal slits all the way around the edge. Cut them as close together as you can, but don't worry if they're not all spaced out exactly the same; it's organic!

Once you've got one side nailed, do the same to the other side. Genius!

When you're done snipping, literally ruffle your feathers a little!
Using your finger, gently rub down the feather in the opposite direction so it messes up how they sit a little. I quite like really split feathers - to make sure you have a few gaps in your piece, carefully snip out a few little bits or even just snip the corners off a couple of the edges. I've done a few randomly all over, but you can do as much or as little as you like...
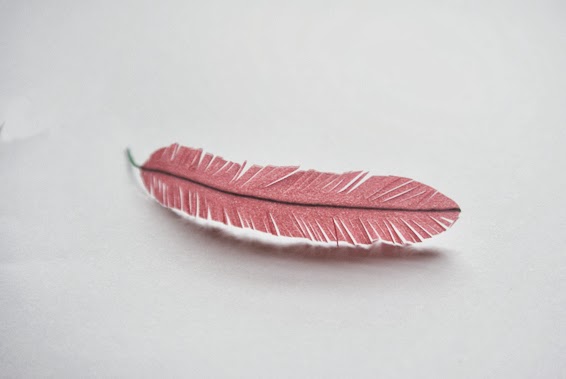
*Ta*Da*
Isn't it awesome? A few minutes ago that was just a bit of tape; it's just amazing what a little bit of TLSC can do :D Now you can embellish gift wrapping 'till your heart's content... or you could even use them as bookmarks. Perfect!
We hope you have fun trying out this weeks tutorial :)
Happy Making
xox
enter our giveaway
great idea!!
ReplyDeleteThanks Lonka :D
DeleteThis is such a lovely and quick idea to jazz up a present! Also love your scissors! Where'd you get them from?
ReplyDeleteLauren
ohhayblogs,blogspot.co.uk
x
Thanks Lauren :D
DeleteI actually got mine from a little haberdashery shop, but I have seen them in places like John Lewis. They're only little, but they make me very happy!
I'm definitely going to have a bash at this! I'm thinking white and gold feathers :) A little bit in love with those scissors too, thanks for the tutorial x
ReplyDeleteHi Ariane! Ooooh! Gold and white would be beautiful! I need to go buy some more tape :) Great idea! You're super welcome for the tutorial too
DeleteClever! Love how cute it looks and tape projects are so much fun :-)
ReplyDeleteThanks Claire :D It's fun and affordable! The best kind of project ;)
DeleteI hope you have fun trying them out!
I have so much washi tape! This is a fabulous idea for making beautiful add-ons to gifts! Thanks so much for the diy!
ReplyDeleteYou're super welcome Anie :D Any excuse to roll out the washi tape! I hope you have fun - they get addictive once you start
DeleteThis blew my mind!! Genius, as always xxx
ReplyDelete:D HOORAY! Thanks so much Laura! That's a really lovely comment to leave me :) I'm so chuffed you're a fan of our little DIYs!
DeleteOhhh!!, it´s a fantastic idea...I´m sure I´ll do it.
ReplyDeleteThanks
ana♥
Thanks, this is a great project for the girls!! you rock!!
ReplyDeleteGenial idea y mil gracias por compartirla.
ReplyDelete